Saturday, June 24, 2017

Sewing Box feat. Simply Crafty SVGs


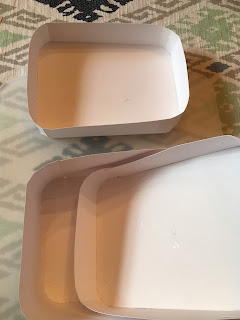
Hi there!  I'm back today with my version of Simply Crafty SVGs Vanity Case.  When I saw the Vanity Case file, the first thing that popped into my head was a little sewing box.  I did made some modifications to this file to meet my needs.  The first thing I did was cut out the bottom pieces.  I knew I wanted the top to overlap the bottom so I enlarged the top pieces just a tinch.  For the inside tray, I decreased the top piece a small bit, but it actually took about 3 tries to get it right.  With trial and error, I got all the pieces cut, put together, and they fit like a glove!  It's a good thing I have patience haha.


Now that I have all the pieces sized correctly, I wanted some color on the inside.  I sprayed the inside of all the pieces with Tattered Angels Glimmer Mist in Turquoise Blue.  I just love using Tattered Angels Glimmer Mists as they give good coverage with a nice sparkly sheen.


Next up was the covering for the box.  I had chosen two different sheets of paper by 7 Gypsies.  On the bottom and the top side I used Gypsy Seamstress 12 x 12 Buttons.  For the very top of the box, I used a coordinating piece of 7 Gypsies paper, Gypsy Seamstress 12x12 Patterns.  I used my electronic cutter to cut out the top and bottom pieces, making sure to make the top piece a tiny bit larger so that it fits over top of the bottom.  This paper is very thick so you have to set it to Cardstock 120 lb. to get a good cut.

At this point, I felt like the cover pieces needed a little color and texture.  I got out my Dylusions Basic Background Stamps and chose the diamond stamp, and for color, I used Tattered Angels High Impact Turquoise Paint.  I used a small dauber and applied the paint to the stamp and just stamped randomly on the outside pieces of the box.


I then glued all the cover pieces onto the box.  For the pull-out tray, I cut the small pieces for the top and applied them inside the tray piece.  I also added a very heavy piece of chipboard to make a separation in the tray.  For the tabs to hold the tray in place, I used the same heavy chipboard, cut a small square, and folded it in half.  I glued one half to the side of the box. To make the tab stand up, I added quite a bit of hot glue underneath the "tab" portion that sticks out.

So that's it!  I hope you like my version of Simply Crafty SVGs Vintage Vanity Box.


Thanks for stopping by!  See you next time!!  ~ Deb

Saturday, June 10, 2017

Minnie Mouse Tag Album with Box

I was asked by a friend's 7 year old daughter if I would make her a little album that she could take with her on her family vacation to Disney.   She also asked if I could make a box for it so that she could "keep it safe".  You can't let a little girl down, so this is what I came up with.


I started out with, of all things, a round cheese box and painted it black.  It needed a couple of coats to cover all the writing on the box.


I made sure that the inside had good black coverage.  then for the top, I only did the edges and about 1" in on the top.


I knew that I wanted to make this into a Minnie Mouse face.  The first thing I did was cut a circle the diameter of the box top.   I then went onto Cricut Design Space and found a Minnie face.  I enlarged and tweaked it to that it would fit perfectly on the top of the box.  I cut circles out for her ears, but had no idea where I was going to place them.  Should I place them on the top of the box?  The bottom of the box?  Well I ended up gluing them to the bottom of the box.  I them made a pink polka dot ribbon to sit between the ears.   The ribbon is attached to the side of the box top.


Next up was the actual album.  I used my Cricut Explore and cut circles out of lightweight chipboard.  I then cut my patterned paper the same size and adhered it to the chipboard.  I added some photo mats and a couple of Disney sticker, punched a hole in the top of each tag, and added a ring to hold it all together.


While Disney usually isn't my style, and I don't really create for children, I have to tell ya.....this was one Happy 7 year old!

Look around and see what you can upcycle!  It's amazing what you can find sitting around your house that can be used for crafting.

Have a great weekend ~ Deb

Thursday, June 8, 2017

Mini Tag Album with Envelope

Hi there crafty friends!  I'm back today to share a Mini Tag Album with Envelope that is on the Cricut Mini Book cartridge.  I bought the actual cartridge years ago when it first came out.  Like most things I "just have to have", it sat for several years and then I loaded it into Design Space.  While looking through the cartridge the tag and envelope grabbed my attention.

So off to search for paper and chipboard I go!  The first thing I did was adjust the tag to the size I wanted.  Then, for the envelope, that had to be tweaked quite a bit.  The original size of the envelope is quite large, so I had to reduce the size quite a bit and make some test cuts until I got it just right.

I cut both the envelope and the tags out in a mid-weight chipboard.  Now the easy part was cutting the paper to cover the chipboard!  All I had to do was load my paper into my Cricut Explore and cut it at the same dimensions as the chipboard.  I think the most difficult part was choosing the paper I wanted to use haha.


Once the chipboard and paper were cut, I glued it all down, then it was time to embellish.  I used paper to give this album a vintage look, so my embellishments will follow the same theme.  On the envelope cover, I used a stencil and some modeling paste and added the hexagons on the bottom left. I'm a big fan of texture and use it whenever I can.  I then went through my stash and found some Tim Holtz elements, as well as a Prima flower.


I used Theresa Collins paper for the tag album, and some embellishments from her same collection.  Next I will show you several pages in this album.


The dress form is a Cottage Cutz die cut.  I have used this die soo many times!  It fits in with a lot of different themes.


I added this pocket and made some tags to go inside.  You can either place a picture or journaling on the tags.


This was specifically for a picture of my husband and I.  

I hope you enjoyed looking at my little Tag Album and Envelope.  Get out your Cricut Mini Album cartridge and take a look!  There's some really cute things in there!

Hope you have a crafty day ~ Deb


Wednesday, June 7, 2017

Surf Shack


I'm very excited to announce that this is my first project for Simply Crafty Svgs!  The file I started with was Garden Shack SVG File.  I'm the kind of person who doesn't like to follow the file exactly, and usually put my own spin on them.

For this Surf Shack, I cut out the pieces labeled Box 1 and Box 2.  I removed the cut window piece, folded it in half, and glued it inside the shack to make a shelf.  From there, I glued the actual box pieces together.  I did leave the side piece unglued so that you can open the side and put a little gift or even a battery tea light.


From there, I needed to figure out a way to make the thatched roof.  I cut a 3" strip of 12" long paper and with my paper cutter, I cut strips 1/4" wide to make the thatching strips.  To apply the strips to the roof, I added a small glue dot on the back end and stuck it down on the back of the roof.  I overlapped the strips so that the whole roof was covered.


Then, I needed to put my thinking cap on.  The whole shack was a tan color with a green thatched roof.  I needed color on the front, sides, and back.  For the front, I used Crushed Olive Distress Ink and covered the whole front, including the door.  For the shelf, I used Peacock Distress Ink.


For the sides, I added a piece of olive green patterned paper from my stash.  Then, on the right side I cut out some colorful hibiscus flowers with my elecronic cutter and applied them to the side.


Then I went back to the front.  I cut a 2" long piece of paper and cut it into thin strips, then sandpapered it for a distressed look.  I added that under the shelf.  I felt like I still needed some tropical feel to this shack, so I cut some palm leaves with my electronic cutter and placed them around the front window, next to the door, and across the top.


For the back, I continued placing the palm leaves until I covered the entire back.


You can't have a surf shack without surfboards!!  I, once again, cut a couple surfboards out with my elecronic cutter and pop dotted them on the side so that they would be a little dimensional.


This is a photo of the left side on a slant so you can see the front door.  At this point, I felt that my surf shack looked pretty good.  The only thing missing was a handwritten sign!  On a piece of brighter blue paper I added CJ's Shack to the sign on the front door!


I hope you enjoyed my version of Simply Crafty SVGs Garden Shack.  Below is a picture of the Garden Shack pattern I used to make my Surf Shack.


I hope you enjoyed my post today and encourage you all to take these SVG files and "make them your own".  You surely don't have to follow the colors and designs that are contained in the picture of the file!  

Have a crafty day ~ Deb, DT Member Simply Crafty SVGS

Tuesday, June 6, 2017

Graphic 45 Book Box

I just love G45 products, their paper, as well as their staples.  This book box is one of their Staples.  Inside the box a tag book is included.  I did add some extra tags for my book.

My plan was to make this for a little girl.  Her mom just loves pink and girly, girly stuff.  I went through my stash of paper and came across several different manufacturers of girly paper.

I started by painting the edges, spine, and back cover with pink paint about 1" in from the edge because paper will be added so there's no need to paint the whole outside.  The inside front cover was also painted about 1" in from the edge.  The side inside the box were all painted pink, and the outside of the box was painted only about 1/4" from the edges.

I then began cutting the paper for the outside of the box.  For the front cover, spine, and back cover, I cut the paper about an inch smaller than the size of the cover, spine, and back cover.  When I applied the paper to the box, I added it 1/2" in from all the edges.  Same thing for the spine and back cover.  With all the paper added, you will see about 1/2" of pink paint around the edges of the paper.


To finish off the front cover, I added a small white frame with thin velcro, so that a picture can be added and you can then stick the frame right back on.


To finish off the spine, I added some hardware from my stash, as well as a glitter thicker representing the first letter of the baby's name.

I did the same thing for the inside front cover, I cut my paper 1" smaller than the actual size I needed and applied it 1/2" from all edges.  The inside front cover contains a pocket which holds three different tags that the mom can write on.  Ribbon was attached to the tags for easy removal.  The tags were from Theresa Collins' Chic Bebe Girl line of paper.


To finish up this book box, I made the tag album.  I measured the tags and the placement of the hole at the top and made a file on my electronic cutting machine software to cut out the paper for the tags. That insured a perfect fit and the brass hole at the top is still visible.


For each tag, there is a different theme, and there is a photo mat for a picture on each tag.  Below is a pic of each tag.


I was given a pink Christmas Tree embellishment a while ago.  I had no idea what I would use it for, but it sure came in handy for this tag book Christmas page!

Photo mats were placed on the reverse side of the tags, so additional pictures can be added.  I used the brass ring that came with the tags to hold the mini album together.  And, if more tags need to be added, I can simply order them from Graphic 45.

Hope you enjoyed this box box, and as always, have a crafty day ~ Deb

Sunday, June 4, 2017

Baby Boom!!

Last summer/fall must have been a busy time for a lot of millennials.  I've been asked to make quite a few onesies for friends and family.

I will start with this set for my son, his wife, and his new son.  I thought these would make great photo shirts for the three of them.  I purchased the images at the Silhouette Design Store.


Next up is a onesie for a friend.  She wanted it to contain the word "adventure"  since that was the theme of the shower.  This is what I came up with.


And, lastly, my son's girlfriend needed a princess onesie for her friend who will be delivering a baby girl any time now!  This image was purchased at the Silhouette Design Store.


Jen, my son's girlfriend, wanted this onesie to put on the first diaper cake she ever made!  I think it turned out great!!


Saturday, June 3, 2017

G45 Wooden Box


As I stated in a previous post, Graphic 45 paper collections are my favorite.  While it took some time to actually cut the paper, once I got started, I found that it was easy!

For this project I used a wooden box.  I painted the side edges and a portion of the top edges black.  I also painted the inside sides of the box.  I didn't need to paint the whole box, because I will be adding strips of paper so only a small portion of the black will be showing on the outside, and the inside bottom and top will be covered completely with paper.


For this box, I will be using Graphic 45 A Ladies Diary paper collection.  I first chose the paper for the top, cut to size and glued onto the top.  For the top embellishments, I used a couple of the cards and a tag that came with the paper collection.  I also used a Petaloo black flower on the bottom left, a printed flower on the top right, and a die cut dress form.  The middle space looked a little barren, so I added one of Tim Holz's hearts.  I think that gave it the finishing touch.


Now for the inside, I chose two different papers for the inside top and inside bottom.  I'm not one to have the same paper together inside a box or even on a scrapbook layout.  I love to mix patterns, and with the Graphic 45 collections, that's really easy to do!

For the bottom, I added a couple of my favorite cards in the collection.  On the inside top, I used G45 A Ladies Diary pocket and made a tag that I could slip into it.  The ribbon at the end of the tag makes it a little easier to pull out. And on the outside front, I removed the metal closure that came on it, and replaced it with a Tim Holtz clear knob. On the tag, I wrote a message to my BFF, to whom the box was being given.


Well, this concludes My Ladies Diary box.  I hope you enjoyed my version of a simple wooden box.

Have a crafty day ~ Deb

Friday, June 2, 2017

G45 Matchbox


It's no secret that I am a HUGE fan of Graphic 45 products.  I have just about every line of paper they have made, as well as their staples products.  Most of the paper I won't cut because it's just too beautiful lol.  But, what good is the gorgeous paper if you don't use it?

For the project, I used the Graphis 45 By the Sea collection and their Small Matchbox.  I inked the edges of the box with Tim Holtz Distress Ink in Wild Honey.  I then chose the paper I wanted to use for the top and sides.  I cut the paper about 1/8" smaller than the actual size of placement area.  For the top, I mitered the edges so that it would have a nice clean look.  I ran the strips through my Xyron X and applied to box top and sides.

To finish off the top, I used the seahorse from Tim Holtz's Sand and Sea die.  I used several colors of distress ink on the seahorse.  I then covered the whole seahorse with Tim Holtz Clear Rock Candy Crackle Paint.  When dried, this left small crackles throughout the seahorse.  I then cut some coral and seaweed with my Cricut Explore. I sanded the edges of the coral and seaweed to give it a distressed look.  The finishing piece to the top was a piece of old fishing net applied to the underside of the square hole in the top of the box.

For the inside, I cut paper the size of the bottom and glued it in.  I then used the lighthouse card contained in the paper pack and placed it in the bottom center.


I hope you like my version of the Graphic 45 Small Matchbox.  I found that it's really not too difficult to cut into your favorite papers!!!

Have a crafty day ~ Deb