Tuesday, October 24, 2017

Primitive Pumpkin Trio


Happy Fall!  There's a crisp in the air and the leaves are changing colors.  It's time to change our home decor for Fall.

I have made a trio of Primitive Pumpkins which I think would look great in most any decor.  I will show some close-ups of each pumpkin, and there is a step by step tutorial over on the  Canvas Corp Brands Blog.  When you go to the blog, just scroll down to the second project and you will see the tutorial for these Primitive Pumpkins!


I hope you liked my version of primitive style pumpkins!

Have a crafty day ~ Deb  

Friday, October 6, 2017

Bat Girl Treat Cup Card


Hi there!  This week for The Cutting Cafe we were to use the Halloween and Fall Treat Cup Cards file for our weekly project.  This is a super cute file which consists of a bat, witches boot, acorn, and candy corn treat box cards, along with sentiments for each file.

Since October is Halloween and also Breast Cancer Awareness Month, I decided to make my card pink for Breast Cancer Awareness.  Every year I have a couple of people I send breast cancer encouragement cards to, and this year they will get the bonus of Good N Plenty candy too!

If you've never checked out The Cutting Cafe, you need to go take a look.  There are a lot of super cute files in the store!!

Thanks for looking!

~Deb

Saturday, September 23, 2017

Glamping


What is ‘glamping’?, you may ask.
Well… it’s a trend that offers outdoor enthusiasts an upgrade on rest and recreation known as glamorous camping. When you’re glamping, there’s no tent to pitch, no sleeping bag to unroll, no long journey to find a bathroom. Whether you’re staying in a tent, yurt, airstream, pod, igloo, hut, villa, cabin, cube, teepee or treehouse, glamping is a way to experience the great outdoors without sacrificing luxury. Sounds good, right?!
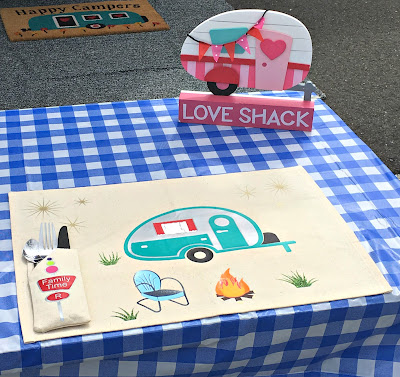
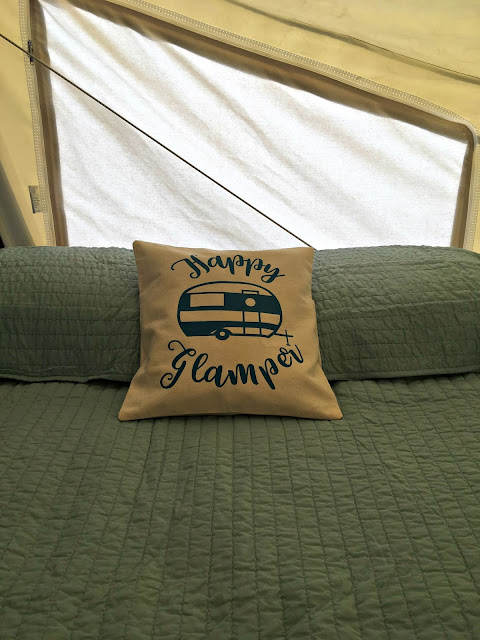
Using Canvas Corp supplies, I have made a couple of glamping inspired home decor elements like cushion cover and table setting… are you ready?


My husband and I were looking at new campers. I really liked the Retro ones, but I knew the hubby would never go for it. So the next best thing would be fun, retro placemats! Off to Canvas Corp I went because they always have the canvas products I need/want. While shopping, I noticed that there were Cutlery Holders, how cool is that! The Cutlery Holders went into my cart, as well as placemats and a pillow cover.

For my project, I used the following supplies:

Canvas Corp Canvas Placemat
Canvas Corp  Cutlery Holder
Canvas Corp Square Canvas Pillow Cover
Heat Transfer Vinyl
Silhouette Cameo
Silhouette Designer Software
Heat Press
E-6000 Fray Lock


To see the full tutorial on how I made these super cute projects, head on over to the Canvas Corp Blog!!

Have a crafty day ~ Deb

Tuesday, September 19, 2017

Witch's Boot Card


Hey there!  Today I'm sharing The Cutting Cafe's Witch Boot Card.  This card is not only perfect for Halloween, but can also be altered a little bit to be used a a country style boot.

I started out by cutting all my pieces on my electronic cutting machine.  There were a couple of pieces I did not use on the final card.  Those were the pieces that made the buckle on the boot band.


To begin assembly, I placed the printed boot piece on top of the solid boot piece and adhered it with glue.  I knew I wanted something hanging from the back of the boot but didn't know exactly what so I went digging through my stash and found a dangle crystal.  I strung the crystal on some orange baker's twine and secured the ends under the boot band.  I then thought to add some purple to the card so I added a piece of purple baker's twine the same way as the orange.  I then adhered the boot band to the boot.


For the finishing touches, I added some Tim Holtz Distress Glitter to the star that sits on the toe of the boot,  and took my sharpie and colored two of them purple to add as buttons on the back of the boot.


Here's a few pics of the finished product!  Hope you liked today's project.  Don't be afraid to change things up to make them your own!

~ Deb


Thursday, September 7, 2017

Cutting Cafe Acorn Treat Cup Card & Giveaway


Welcome to the Cutting Cafe’s Blog Hop and Giveaway! Today we are doing something a bit different in that each design team member is giving away the very set(s) that were used to create the projects on our Blogs. You should of came from Regina Easter blog.
To create my project I used the Acorn Treat Cup Card which is part of the Halloween and Fall Treat Cup Cards. I used Canvas Corp burlap for the top of my acorn to add some texture and also added some Vintage Photo Distress Ink to the edges of the card. The sentiment I used also comes with the svg file, as well as sentiments for all of the other included cup cards. It's a little difficult to tell from the picture, but I did foil the sentiment with Gold Deco Foil, and used a Gina Marie Die to cut the sentiment out.
I felt as though the treat inside the cup needed to be orange to add a "pop" of color. So I ran out to my local CVS to pick up some candy corn....after all Halloween items are in all the stores now. Well, to my surprise, CVS had NO candy corn! They were loaded with back to school supplies! So what does a girl do? She scours the candy aisle until she finds a candy which is orange. What I found is quite interesting...they are orange creme Gummy Bears. I cant say they are my favorite flavor, but they sure did the trick for my "pop" or orange.
If you would like to win this set, which is loaded with super cute Halloween and Fall treat cup cards, just leave me a comment letting me know what you think about my project. I will be drawing one winner on Friday, June 9, 2017.

Next up please visit my DT sista Maria Pilar. She will have a fun project and Cutting Cafe set for you to win also!!
If you get lost in the hop, you can view the participants below. Be sure to visit each blog for a chance to win.
Deb Peterson Rauch (you are here)
and we saved the best for last
To be eligible for the freebies, you have to visit each blog, and leave a comment on each blog also.
I hope you enjoyed our Hop today and look forward to seeing many of you for our bi-weekly blog post projects for The Cutting Cafe!
Craft On ~ Deb

Monday, August 21, 2017

3D Halloween Coffee Cup


Hi there!  Today I am sharing The Cutting Cafe's 3D cup, as well as a small sample their Halloween Photo Props.

The paper I used is a retired line by Theresa Collins called Masquerade.  I added the lime green piece of paper to the top of the mug using a Kiwi Lane Designs border template.  On it I applied a combination of Faber-Castell Bead Gel and Tattered Angels Glimmer Mist to make it a liquidy purple.  I then let it drip onto the paper, and I stood the paper up so that I could get a "runny effect".


For the prop pieces, I used Tim Holtz Distress Ink in Vintage Photo around the edges.


This would be a great addition to a child's Halloween party.  Or for that matter, even an adults Halloween party.  

I hope I have inspired you to use The Cutting Cafe's 3D Cup in an "out of the box" way.

Have a crafty day ~ Deb


Thursday, July 27, 2017

Prickly Birthday Card


I needed a Birthday Card in a hurry  It was my Aunt's 94th Birthday!.  For my family that is a huge milestone!!  I didn't have time to run out and buy anything special, so I used what was in my stash.

Since my Aunt loves the desert, I thought a cacus theme would be perfect!  I pulled out my Newton's Nook Cuppa Cactus stamp set, and a DCWV paper pack that was cactus themed.  I colored the cacti with my Prismacolor Colored Pencils using some techniques I learned in my Kit and Clowder Pencil Class, and fussy cut them out.

I used Gina Marie's largest rectangle cross stitch die for the base layer of the card.  I then added a couple of thinner strips of paper from the same paper pack for the cacti to sit on.  I pupped the cacti up with 3d foam squares to give it a more dimensioal look.

I know my Aunt is just gonna love his card!!

Thanks for stopping by!  As always, have a crafty day ~ Deb


Tuesday, July 18, 2017

Personalized Crafting Aprons


Hey there!  As one of my projects for the Canvas Corp Creative Crew, I made these personalized crafting aprons.  I think they are fun and useful at the same time.

Here are a few more pictures showing some of the details.  For a full step-by-step tutorial, see my post on the Canvas Corp Blog.


As always, have a crafty day!  See you next time ~ Deb

Thursday, July 6, 2017

Swim and Surf


It's that time of year when everyone is swimming and surfing.  Soo....why not make some treat boxes for your son's or daughter's party using Simply Crafty SVGs Swim and Surf Box Set!

Today I used the girl's version of the boxes.  I have to say, these are the cutest party favors I've seen in a long time!  The first thing I did was cut out the pieces for each box set.  There are PDF instructions explaining how to put the boxes together.

I added some Kat Scrappiness sequins to the bathing suit to give it some dimension and shine.  Its kind of difficult to see in the picture, but there are small lime sequins in the center of some of the circles.


I also added a few sequins to the surfboard because that center line looked a little plain.  


Here's a close-up of the surfboard base showing the elements I added to give it a little more color and fun.


I hope I inspired you today to make something summery!  Have a crafty day ~ Deb

Saturday, June 24, 2017

Sewing Box feat. Simply Crafty SVGs


Hi there!  I'm back today with my version of Simply Crafty SVGs Vanity Case.  When I saw the Vanity Case file, the first thing that popped into my head was a little sewing box.  I did made some modifications to this file to meet my needs.  The first thing I did was cut out the bottom pieces.  I knew I wanted the top to overlap the bottom so I enlarged the top pieces just a tinch.  For the inside tray, I decreased the top piece a small bit, but it actually took about 3 tries to get it right.  With trial and error, I got all the pieces cut, put together, and they fit like a glove!  It's a good thing I have patience haha.


Now that I have all the pieces sized correctly, I wanted some color on the inside.  I sprayed the inside of all the pieces with Tattered Angels Glimmer Mist in Turquoise Blue.  I just love using Tattered Angels Glimmer Mists as they give good coverage with a nice sparkly sheen.


Next up was the covering for the box.  I had chosen two different sheets of paper by 7 Gypsies.  On the bottom and the top side I used Gypsy Seamstress 12 x 12 Buttons.  For the very top of the box, I used a coordinating piece of 7 Gypsies paper, Gypsy Seamstress 12x12 Patterns.  I used my electronic cutter to cut out the top and bottom pieces, making sure to make the top piece a tiny bit larger so that it fits over top of the bottom.  This paper is very thick so you have to set it to Cardstock 120 lb. to get a good cut.

At this point, I felt like the cover pieces needed a little color and texture.  I got out my Dylusions Basic Background Stamps and chose the diamond stamp, and for color, I used Tattered Angels High Impact Turquoise Paint.  I used a small dauber and applied the paint to the stamp and just stamped randomly on the outside pieces of the box.


I then glued all the cover pieces onto the box.  For the pull-out tray, I cut the small pieces for the top and applied them inside the tray piece.  I also added a very heavy piece of chipboard to make a separation in the tray.  For the tabs to hold the tray in place, I used the same heavy chipboard, cut a small square, and folded it in half.  I glued one half to the side of the box. To make the tab stand up, I added quite a bit of hot glue underneath the "tab" portion that sticks out.

So that's it!  I hope you like my version of Simply Crafty SVGs Vintage Vanity Box.


Thanks for stopping by!  See you next time!!  ~ Deb

Saturday, June 10, 2017

Minnie Mouse Tag Album with Box

I was asked by a friend's 7 year old daughter if I would make her a little album that she could take with her on her family vacation to Disney.   She also asked if I could make a box for it so that she could "keep it safe".  You can't let a little girl down, so this is what I came up with.


I started out with, of all things, a round cheese box and painted it black.  It needed a couple of coats to cover all the writing on the box.


I made sure that the inside had good black coverage.  then for the top, I only did the edges and about 1" in on the top.


I knew that I wanted to make this into a Minnie Mouse face.  The first thing I did was cut a circle the diameter of the box top.   I then went onto Cricut Design Space and found a Minnie face.  I enlarged and tweaked it to that it would fit perfectly on the top of the box.  I cut circles out for her ears, but had no idea where I was going to place them.  Should I place them on the top of the box?  The bottom of the box?  Well I ended up gluing them to the bottom of the box.  I them made a pink polka dot ribbon to sit between the ears.   The ribbon is attached to the side of the box top.


Next up was the actual album.  I used my Cricut Explore and cut circles out of lightweight chipboard.  I then cut my patterned paper the same size and adhered it to the chipboard.  I added some photo mats and a couple of Disney sticker, punched a hole in the top of each tag, and added a ring to hold it all together.


While Disney usually isn't my style, and I don't really create for children, I have to tell ya.....this was one Happy 7 year old!

Look around and see what you can upcycle!  It's amazing what you can find sitting around your house that can be used for crafting.

Have a great weekend ~ Deb