Do you get tired of the pesky door-to-door solicitors! I'm not about where you live, but where I live, we get people selling anything from newspapers, to new roofs, to house renovations, and more recently some saying they can lower our electric bill!
Well, a friend of mine who as a toddler, as well as a couple of dogs, is disgusted with these solicitors tool She asked me to make a sign for her to display on her front porch to help discourage these solicitors.
With my friend, a door knock or door bell ring, started a chain reaction! The dogs would start barking, which woke up the baby an made him cry, then you have a very unhappy mother!!
This is the sign we came up with! To my knowledge she hasn't had any further trouble with solicitors at her home.
This was a quick and easy sign to make. I took a piece of 10 x 16 piece of wood, sanded it down so that it was really smooth. Added a coupe of light coats of Golden Oak Stain and let dry. While the board was drying I used my Silhouette Cameo and a piece of 651 Outdoor Adhesive vinyl to cut out the lettering. I then applied the lettering to the sign and added a piece of deerskin leather to the top so that it can be hung! And it's a quick way to make a sign when you have limited time!!
Thanks for looking, and as always, have a crafty day ~ Deb
Monday, May 29, 2017
Thursday, May 25, 2017
First Grandson Onesies!!
I thought I was totally prepared with handmade HTV onesies for my soon-to-be arriving grandbaby. Well, I wasn't.
Two days ago, I was blessed with my first grandchild.....a grandson. He was a big little guy. He weighed in at 9 lbs. 14 oz.
The onesies I had prepared in advance were size Newborn. He was too big to fit into them lol. So what does a new grandmom do? She stays up all hours of the night to re-make the onesies in 0-3 months, a size which will fit him for a short time.
On top of that, my other son and his girlfriend also wanted to give the baby a handmade onesie, so I added that to my list of things to do immediately!
When I saw his little face, I knew some of the onesies I had made, didn't fit his little personality. So these are the ones I made for my precious grandson.

Two days ago, I was blessed with my first grandchild.....a grandson. He was a big little guy. He weighed in at 9 lbs. 14 oz.
The onesies I had prepared in advance were size Newborn. He was too big to fit into them lol. So what does a new grandmom do? She stays up all hours of the night to re-make the onesies in 0-3 months, a size which will fit him for a short time.
On top of that, my other son and his girlfriend also wanted to give the baby a handmade onesie, so I added that to my list of things to do immediately!
When I saw his little face, I knew some of the onesies I had made, didn't fit his little personality. So these are the ones I made for my precious grandson.
Here are the ones that I made for my son and his girlfriend to give their new nephew.
We are definitely a blessed family. Thanks for stopping by and have a crafty day ~ Deb
Tuesday, May 23, 2017
HTV Shirt Day!
My niece was visiting a couple of weeks ago and she wanted to make some t-shirts for her and her husband.
Off to my craft room we go! She wanted some summer/beach/boating themed shirts for them. After looking in the Silhouette Design store and getting a few images, we also created some of our own images.
They boat a lot, so, of course, Boat Hair Don't Care was on the list. Also on the list was a Beach Life Shirt, a couple of fishing shirts, and a shirt with their boat name on it. We cut all the images out on my Silhouette Cameo, and heat pressed them on the shirts with my heat press.
My niece had soo much fun, she ordered a Silhouette Cameo and Heat Press for herself. She is now enjoying the craft of HTV!!
Thanks for looking! Have a crafty day! ~ Deb
Off to my craft room we go! She wanted some summer/beach/boating themed shirts for them. After looking in the Silhouette Design store and getting a few images, we also created some of our own images.
They boat a lot, so, of course, Boat Hair Don't Care was on the list. Also on the list was a Beach Life Shirt, a couple of fishing shirts, and a shirt with their boat name on it. We cut all the images out on my Silhouette Cameo, and heat pressed them on the shirts with my heat press.
My niece had soo much fun, she ordered a Silhouette Cameo and Heat Press for herself. She is now enjoying the craft of HTV!!
Thanks for looking! Have a crafty day! ~ Deb
Summer Journal Page featuring Julie Nutting Doll Stamp
I finally purchased my first Dylusions Journal! I was soo excited to get it I just had to do a page right away.
My favorite season is Summer and the Beach, so going with that theme, I started my page. For the background, I used Tim Holtz's Distress Oxide Ink in Faded Jeans and Broken China. I made a wave stencil and cut it out with my Silhouette Cameo. I got out my Faber Castell Whipped Spackle and some blue acrylic paint. I blended the two together to use with the stencil. I placed the stencil over the page and applied the colored Whipped Spackle.
I knew I needed sand, so I went across the street to the beach and picked up a small jar of sand. I mixed the sand with some Mod Podge just until all the sand was covered. Using a spackle knife, I applied the sand to my journal page and pressed hard to make sure it stuck. Then it was time to wait for the blue background and sand to dry.
While that was drying, I stamped my Julie Nutting doll on a piece of Julie's A4 Buff paper. That is a great paper pad because it gives you several different skin tones. For the clothes, I paper pieced them and glued them on. The hair and hair band were colored using my Spectrum Noir markers.
Once everything was dry, I glued my girl so that her knees were in the sand. I then added a couple of brass shell embellishments on the sand, and a sailboat in the distance. The sentiment says it all! "Simple Times".....they are the times I cherish while at the beach where you can forget everything and totally relax while listening to the sea.
Thanks for stopping by! Have a crafty day ~ Deb
Mother's Day Card
Hi there! This year I wanted to make my mother-in-law a different type of Mother's Day card. The first place I went was the Silhouette Design Store. They have soo many types and shapes of cards, it's really hard to choose.
When I came across this sewing machine, I knew that was the perfect one! My mother-in-law has been a long time seamstress and I just knew she would love this.
I cut the card out with my Silhouette Cameo using different patterned papers from my stash. For the needle and handle, I heat embossed them silver using embossing power by Brutus Monroe. I then added just a few enamel dots and a flower and it was done!
This was definitely a quick and easy card to make!!
Thanks for stopping by! ~ Deb
Easter Basket Lining and Onesie
I know this post is a little late, but better late than never, as my Mom always told me!
A friend of mine needed an Easter basket for her daughter. She couldn't find a lined basket that she liked. So, she bought a nice white basket and some really pretty fabric to make a liner. Along with the basket and fabric, she also dropped off a onesie to be deisnged for Easter.
I had never made a basket lining before, so the first place I went was Google. I don't know how I ever lived without Google! You can find everything there! I found directions on how to make a basket lining for a round basket, took the measurements I needed and cut the fabric.
The first part was to sew the bottom circle to the side fabric. The side fabric had to be gathered some to fit the circle. The next to sew together was the flap. I measured twice and cut once for the front flap and back flap pieces.
The next to sew together was the flap. I measured twice and cut once for the front flap and back flap pieces. I pinned the flap pieces onto the lining just to be sure they were the right length.
Then sewed the flap pieces to the basket lining and added some ribbon at the end of each flap so that it could be tied on the basket.
On to the onesie. My friend had picked out a super cute Easter image for the onesie. I purchased this image from Apex Embroidery and cut it out of Heat Transfer Vinyl. Using my heat press, I pressed it onto the onesie.
My friend was extremely happy with both the basket and the onesie!! That sure makes a girl feel good!
Thanks for stopping by! Have a crafty day ~ Deb
Monday, May 22, 2017
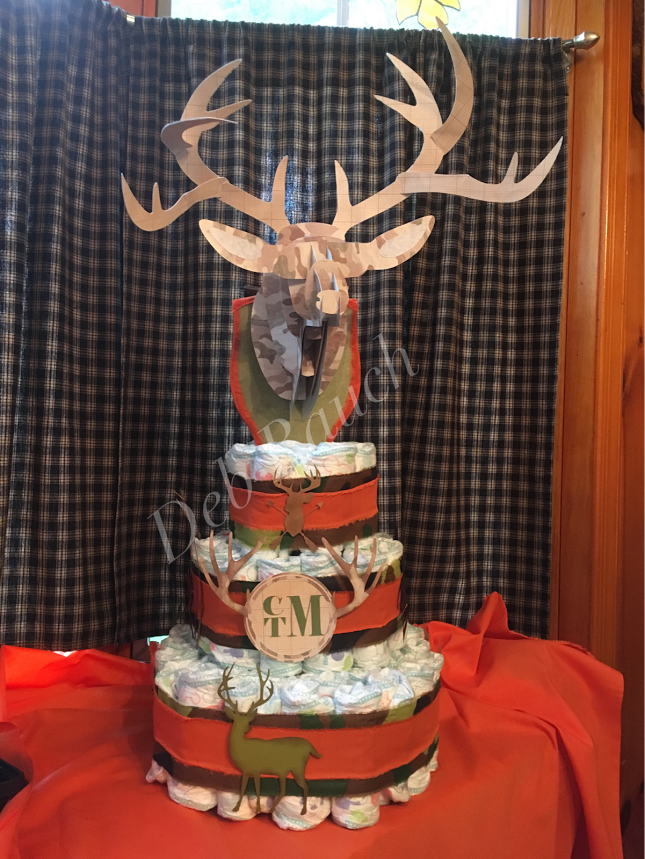
3D Deer Head Diaper Cake
I was asked by a friend to make a hunting themed diaper cake for her daughter's baby shower. The only ideas she could give me was camouflage and orange. So, I put my thinking cap on and headed over to the Silhouette Design Store. In the Store, I found a 3D deer head which I thought would be perfect for the cake topper! I proceeded to cut all the pieces out for the deer head.
I cut out two sets of antlers so that I could add some thin wire between them to be able to bend, if needed. I then glued the antlers, and green "plaque", and slid the head pieces on the head.
Then it was time to work on the cake. I rolled and rubber banded 76 size 2 diapers. I use size 2 in case the mom-to-be wants to use the cake as a decoration for a while.
I could not find any camoflage ribbon, so I purchased 1/2 yard camo fabric and 1/4 yard orange fabric.
I cut the camo fabric at 3" and the orange fabric at 1.5" to use as my ribbon. I also made some bows out of the fabric to place on the backwhere the ribbon meets.
For the front, I knew I wanted to add his initials. I found an antler monogram file in the Silhouette Store. I added his initials and placed them inside. I then placed the antler monogram center front of cake. I also added a couple small images on the bottom and top layer of the cake on the front.
Left Side
Right Side
And here is a picture of it surrounded by all the presents at the baby shower. It was a huge hit at the shower!
I hope you enjoyed my version of a deer hunting diaper cake!! Have a crafty day ~ Deb
Subscribe to:
Posts (Atom)