Tuesday, May 23, 2017
Mother's Day Card
Hi there! This year I wanted to make my mother-in-law a different type of Mother's Day card. The first place I went was the Silhouette Design Store. They have soo many types and shapes of cards, it's really hard to choose.
When I came across this sewing machine, I knew that was the perfect one! My mother-in-law has been a long time seamstress and I just knew she would love this.
I cut the card out with my Silhouette Cameo using different patterned papers from my stash. For the needle and handle, I heat embossed them silver using embossing power by Brutus Monroe. I then added just a few enamel dots and a flower and it was done!
This was definitely a quick and easy card to make!!
Thanks for stopping by! ~ Deb
Easter Basket Lining and Onesie
I know this post is a little late, but better late than never, as my Mom always told me!
A friend of mine needed an Easter basket for her daughter. She couldn't find a lined basket that she liked. So, she bought a nice white basket and some really pretty fabric to make a liner. Along with the basket and fabric, she also dropped off a onesie to be deisnged for Easter.
I had never made a basket lining before, so the first place I went was Google. I don't know how I ever lived without Google! You can find everything there! I found directions on how to make a basket lining for a round basket, took the measurements I needed and cut the fabric.
The first part was to sew the bottom circle to the side fabric. The side fabric had to be gathered some to fit the circle. The next to sew together was the flap. I measured twice and cut once for the front flap and back flap pieces.
The next to sew together was the flap. I measured twice and cut once for the front flap and back flap pieces. I pinned the flap pieces onto the lining just to be sure they were the right length.
Then sewed the flap pieces to the basket lining and added some ribbon at the end of each flap so that it could be tied on the basket.
On to the onesie. My friend had picked out a super cute Easter image for the onesie. I purchased this image from Apex Embroidery and cut it out of Heat Transfer Vinyl. Using my heat press, I pressed it onto the onesie.
My friend was extremely happy with both the basket and the onesie!! That sure makes a girl feel good!
Thanks for stopping by! Have a crafty day ~ Deb
Monday, May 22, 2017
3D Deer Head Diaper Cake
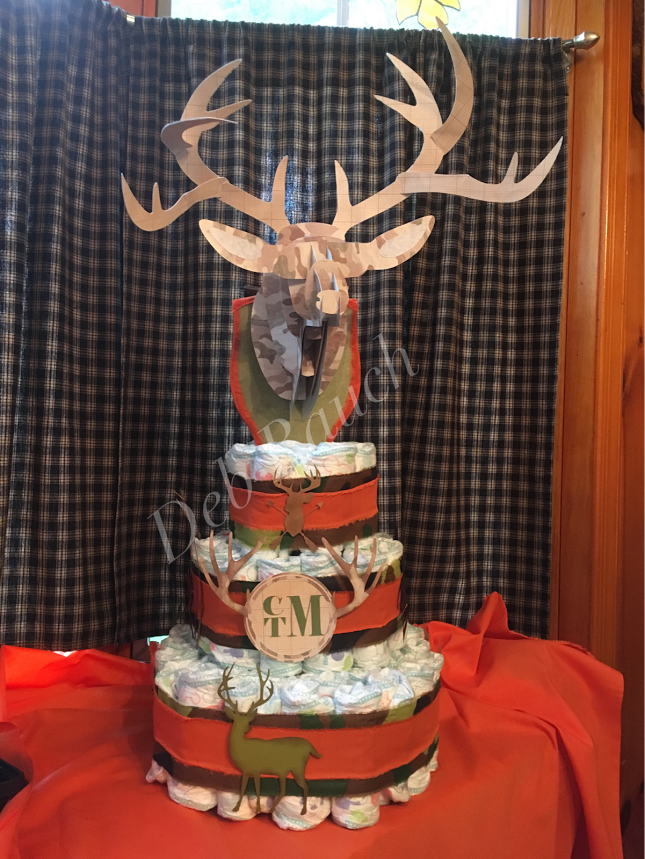
I was asked by a friend to make a hunting themed diaper cake for her daughter's baby shower. The only ideas she could give me was camouflage and orange. So, I put my thinking cap on and headed over to the Silhouette Design Store. In the Store, I found a 3D deer head which I thought would be perfect for the cake topper! I proceeded to cut all the pieces out for the deer head.
I cut out two sets of antlers so that I could add some thin wire between them to be able to bend, if needed. I then glued the antlers, and green "plaque", and slid the head pieces on the head.
Then it was time to work on the cake. I rolled and rubber banded 76 size 2 diapers. I use size 2 in case the mom-to-be wants to use the cake as a decoration for a while.
I could not find any camoflage ribbon, so I purchased 1/2 yard camo fabric and 1/4 yard orange fabric.
I cut the camo fabric at 3" and the orange fabric at 1.5" to use as my ribbon. I also made some bows out of the fabric to place on the backwhere the ribbon meets.
Left Side
Right Side
And here is a picture of it surrounded by all the presents at the baby shower. It was a huge hit at the shower!
I hope you enjoyed my version of a deer hunting diaper cake!! Have a crafty day ~ Deb
Tuesday, May 9, 2017
Snips and Snails Baby Banner & Diaper Cake
STEP 1
The first thing I did was choose the fabrics I wanted to work with, and cut them into the shapes I needed.
Step 2
I then splattered baby blue High Impact Paint and metallic white High Impact paint on all my pennant pieces. When they were dry, I added a light spray of navy blue and old lace Glimmer Mist.
STEP 3
The lettering was cut on my Silhouette Cameo using paper from the Snips and Snails collection. I distressed the edges of the circle with my distresser. I layered the cut out letter on a solid circle so that the baby blue stood out. I then added some burlap ribbon at the top.
STEP 4
For the end pieces, I cut two ovals out of burlap. I used my Big Shot and Tim Holtz’s Tattered Flower template to cut flowers or each end.
STEP 5
For the blue burlap pennant between the words, I used a burlap circle layered on a piece of paper from the collection, and a tag from the new Baby Tag set.
STEP 6
Between the first pennant, and between the words, I tore some denim and canvas to make a fringy look. I then added some navy glimmer mist, baby blue and white metallic high impact paint.
STEP 7
For the penants at each end, I used my Big Shot and cut Tim Holtz Tattered Flowers and adhered them on the burlap ovals.
STEP 8
I then cut some burlap ribbon and adhered to to the top of each pennant piece.
STEP 9
For the finishing touch, I used the Crop-a-Dile and attached bronze eyelets so I could thread the twine through all pieces.
MATERIALS USED:
Canvas Corp Canvas Fabric
Canvas Corp Burlap Fabric- Blue
Canvas Corp Denim Fabric
Canvas Corp Snips and Snails Mix and Match Pad
Canvas Corp New Baby Tag Pack
Tattered Angels Glimmer Mist- Navy Blue
Tattered Angels High Impact- Baby Blue
Tattered Angels High Impact- Metallic White
Tim Holtz Tattered Flower Die
Scissors
Big Shot
Silhouette Cameo
Prima Edge Distresser
Crop-a-Dile
Bronze Eyelets
Saturday, April 29, 2017
Girl Needs a Beer
Friday, April 7, 2017
Hunny Bunny Onesie
TGIF! Deb here with my first post for Sunsational Stamps. As soon as I saw the Hunny Bunny digi stamp, I knew that I had to put it on a Onesie!
I changed the format of the Hunny Bunny stamp in my Silhouette software to make it a cutting files. I then broke the file down into smaller parts so I could cut each section of the bunny separately. I'm soo glad I have an enormous supply of HTV and Onesies, I didn't have to leave the house to purchase any additional supplies!
Any of Sunsational Stamps digi files can be made into cut files in many electronic cutting machines software.
Have a great day! Hope you enjoyed my version of the Hunny Bunny digi file!